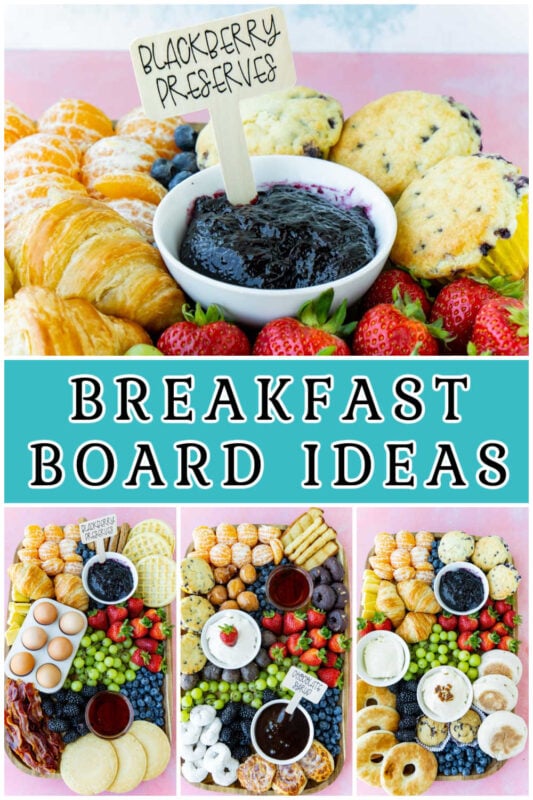
Sponsored by: Cricut. All opinions are honest and my own. This post also contains affiliate links. If you purchase via these links, I may receive a small commission at no additional cost to you. So one of the biggest things lately is charcuterie boards that aren’t actually charcuterie. I’ve made a handful of them including the cutest witch Halloween dessert board last year for a movie night at my house! That post talks all about the mechanics of putting together a board – so I recommend reading it along with this one! This post is going to share some of my favorite breakfast charcuterie board ideas – three different themed boards (you know I love a good theme). The ones you can make yourself, you can make them go with YOUR board! They’re pretty perfect and even my husband said he was super impressed with how they looked on the board! So let’s start there and then we’ll talk about the breakfast board ideas!
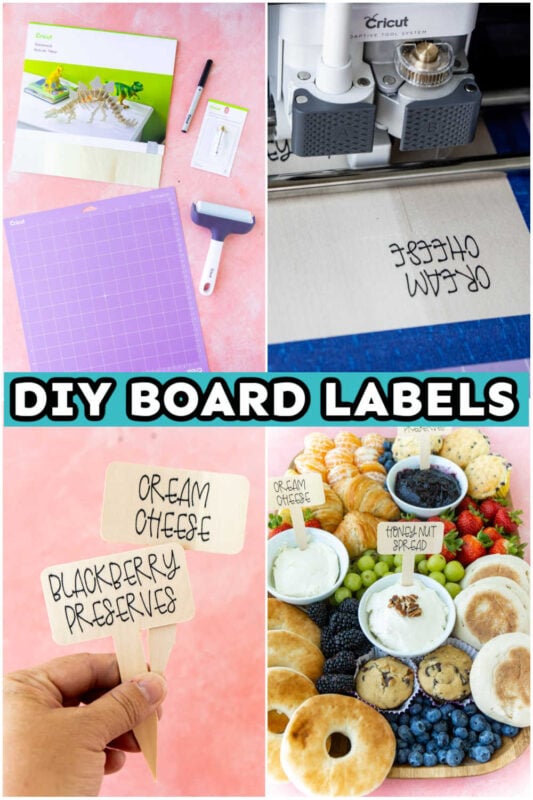
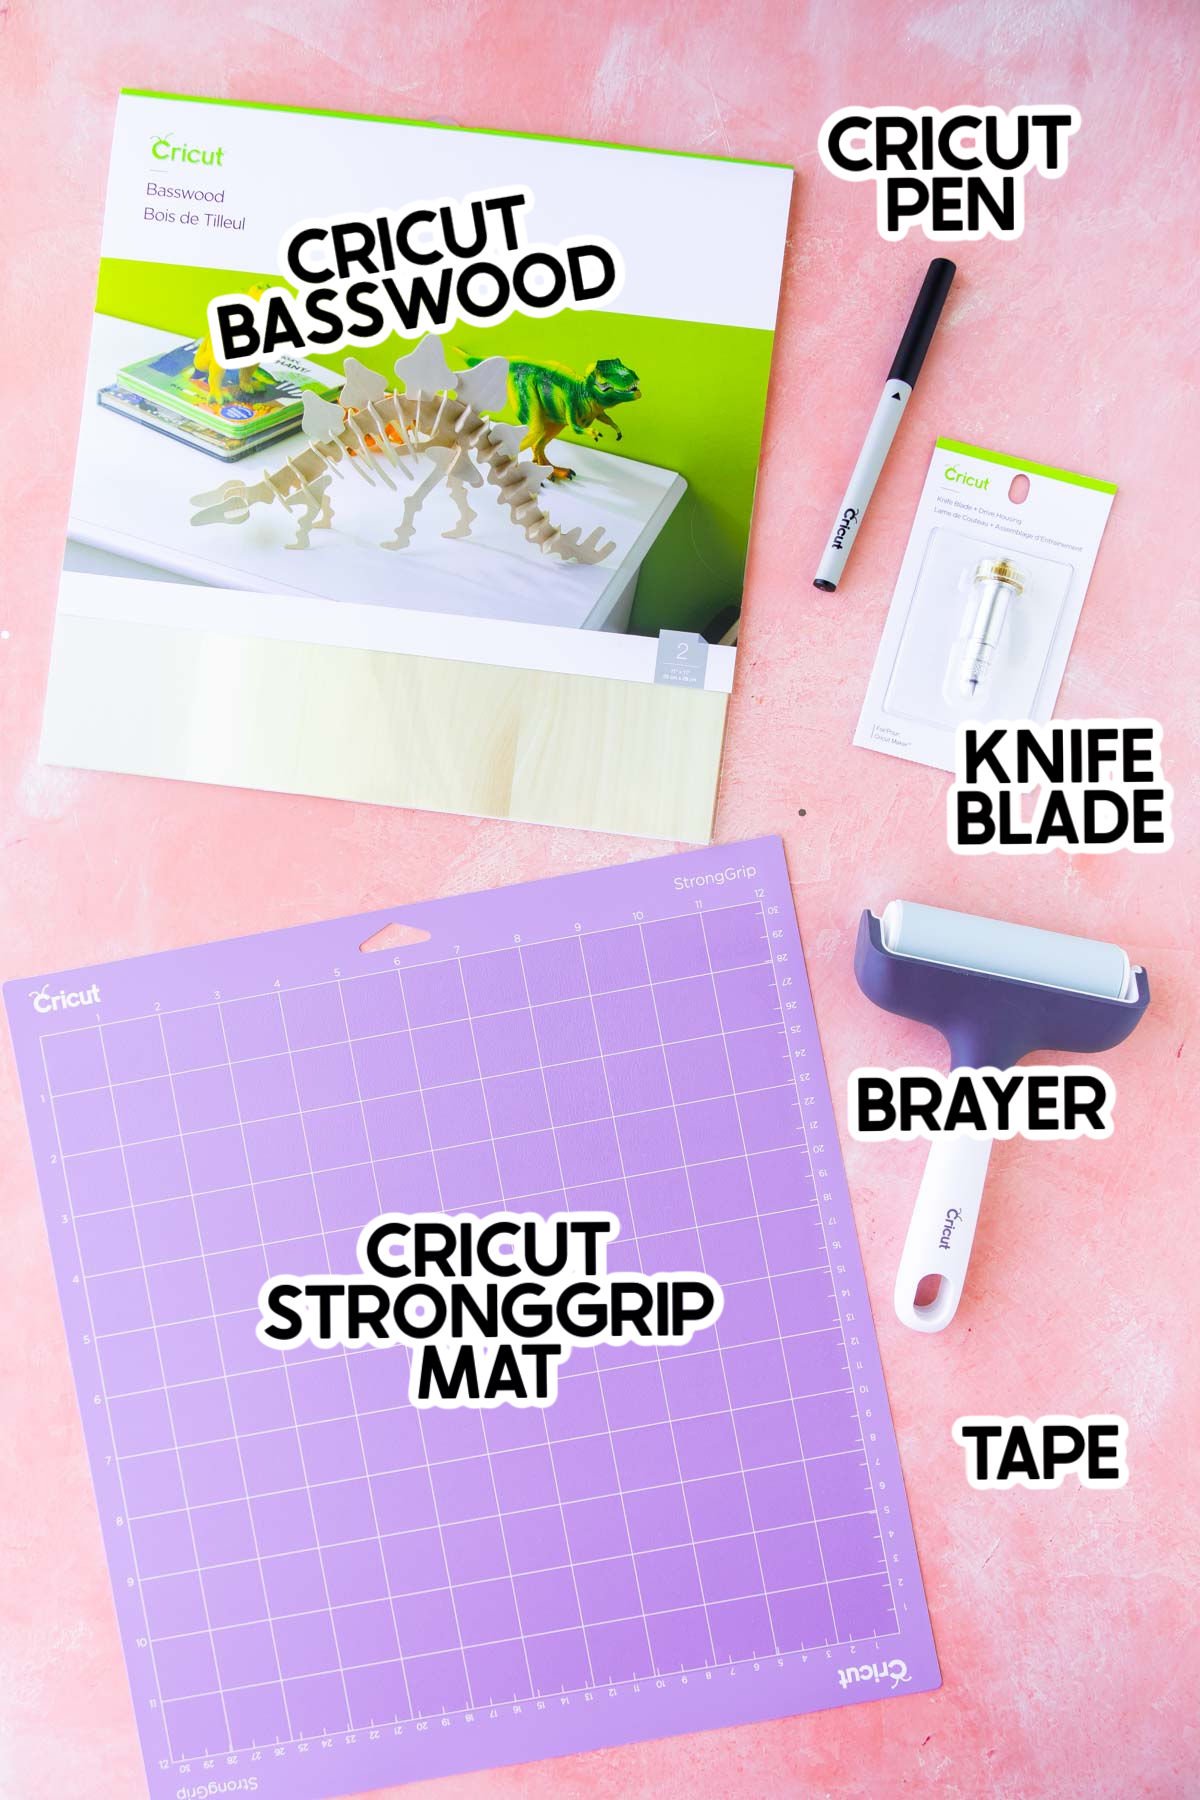
Supplies to make board labels
Supply Notes
Cricut Maker – I didn’t include this in my photo above, but you’ll need a Cricut Maker for this project. I’ve already raved about my Cricut Maker in previous posts so I won’t do it here, but it’s a total crafting game changer with how many different things you can cut! It’s the only machine that uses the knife blade and the best option for this project! Cricut Basswood – the basswood that Cricut sells is 1/16 inch thick and is specifically designed for projects on the Cricut Maker. It cuts great and is perfect in this project!Cricut Knife Blade – the knife blade is the only blade that will work for this project! It’s one of my favorite blades to use to cut everything from wood (like I did with this fun Cricut puzzle) or leather like I did with my DIY superhero costumes! Cricut Pen – I recommend their fine point .4mm pens. I tried (I’ll show you an example in the post below) some of the thicker pens, and they just didn’t work great for writing on the basswood. Cricut StrongGrip Mat – you definitely need the StrongGrip mat for this one. The basswood stays on it so much better, and you don’t want it to move a millimeter! Cricut Brayer – I talked about this in my back to school survival kit, but the brayer is one of my new favorite Cricut accessories. You use it to help secure materials to the mat and in this project, you want that wood secure! Tape – just to make sure that wood doesn’t move, use the tape to secure the wood to the mat! Cricut Design Space File – I made this file customizable so that you can use the labels that I created or resize them, add new ones, etc.
How to make board labels
Okay so this project includes two parts – cutting the wood AND using the Cricut pen to write the labels but it’s all done at once (yay Cricut!!), so I’m going to explain it all at once. And p.s., it’s super easy. Maybe the easiest Cricut project I’ve ever done.
1 – Customize and Finalize the File
Start by opening the Design Space File here. I created labels for all of the different things I could think of that might be on a breakfast board, but I may have missed some! Once you’ve opened the file, you can do a couple of different things to make the labels what you want:
Copy and paste one of the current labels to create a new one (if you have a different spread that you want to add). Resize all of the labels if you want them a bit smaller or larger. Change the font on the labels if you want something a bit less hand written – just make sure to choose a writing font! Change the color of the pen if you want something other than black (although you could just use a different pen in the machine). Hide the labels you don’t want to cut so you only are cutting the ones you will use.
2 – Make It
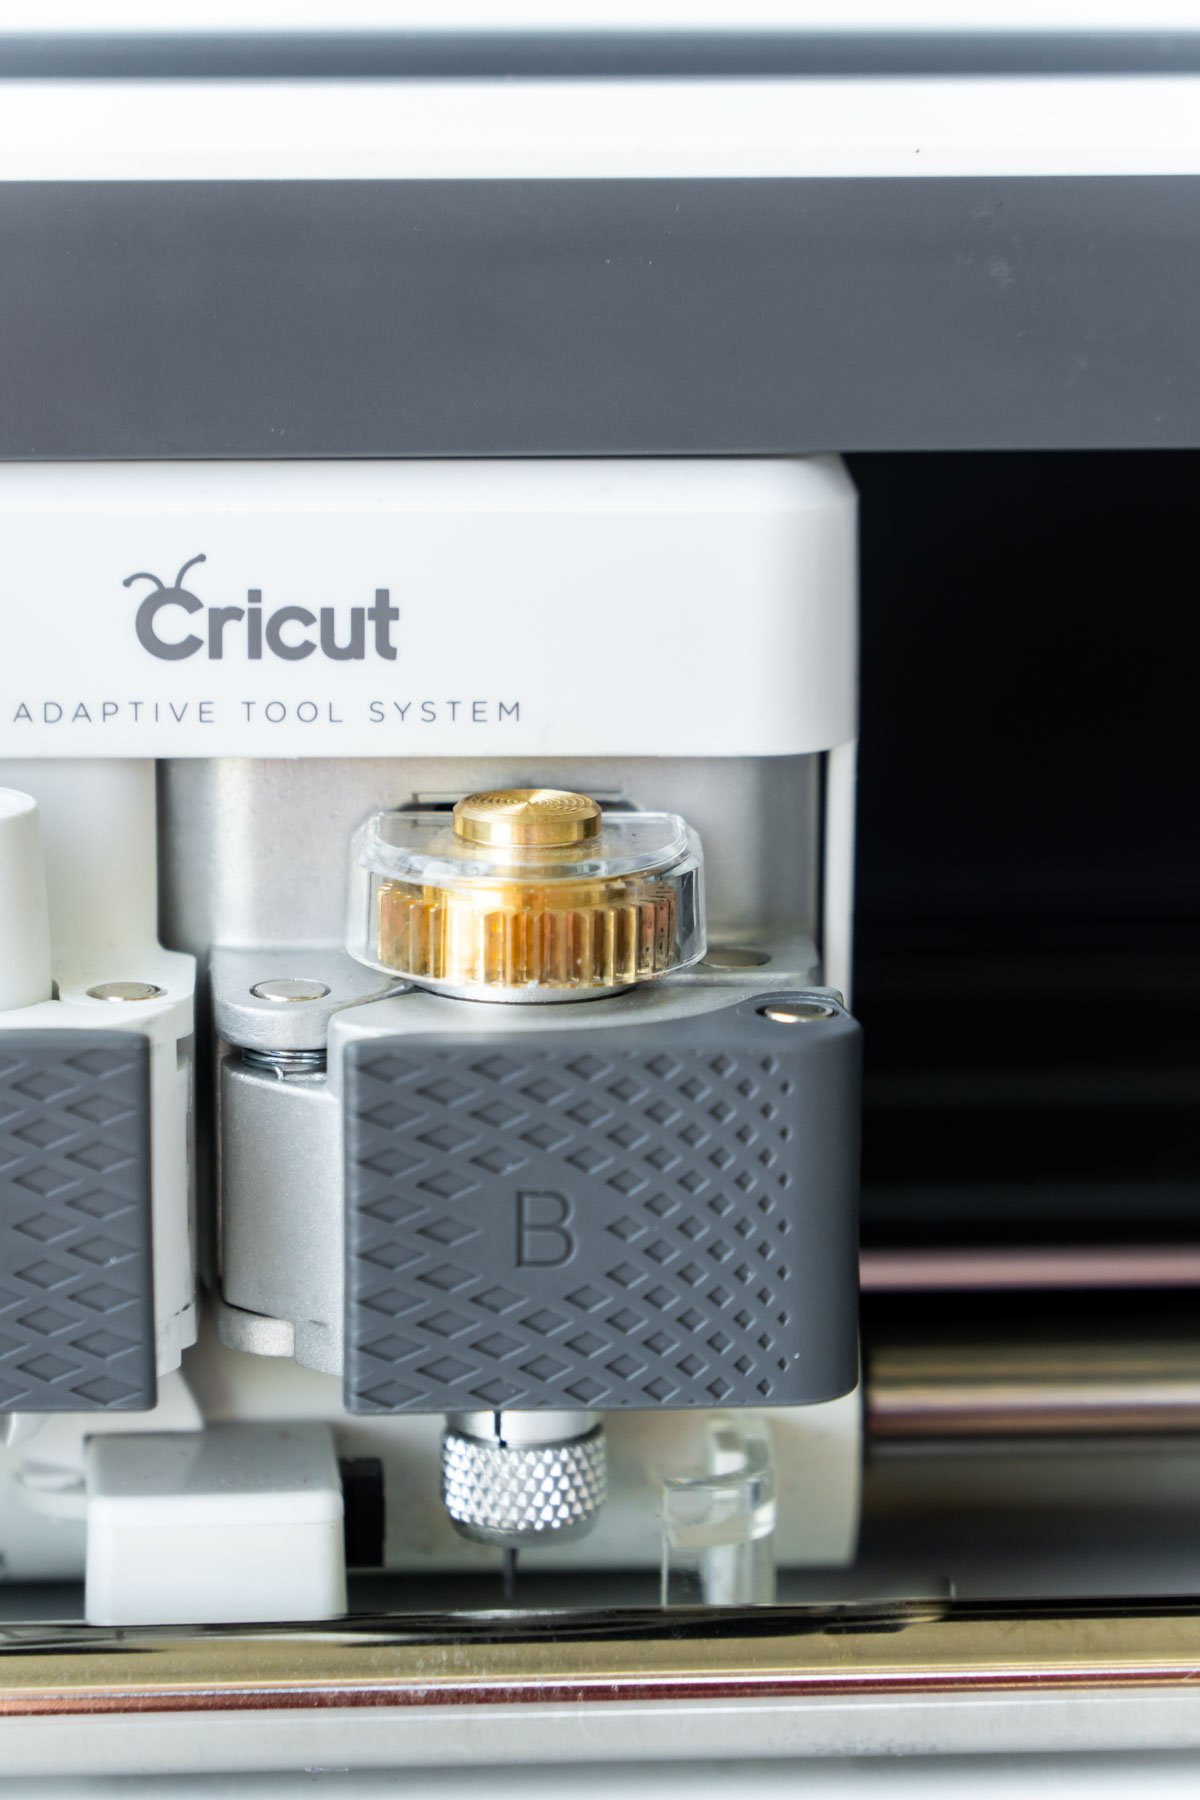
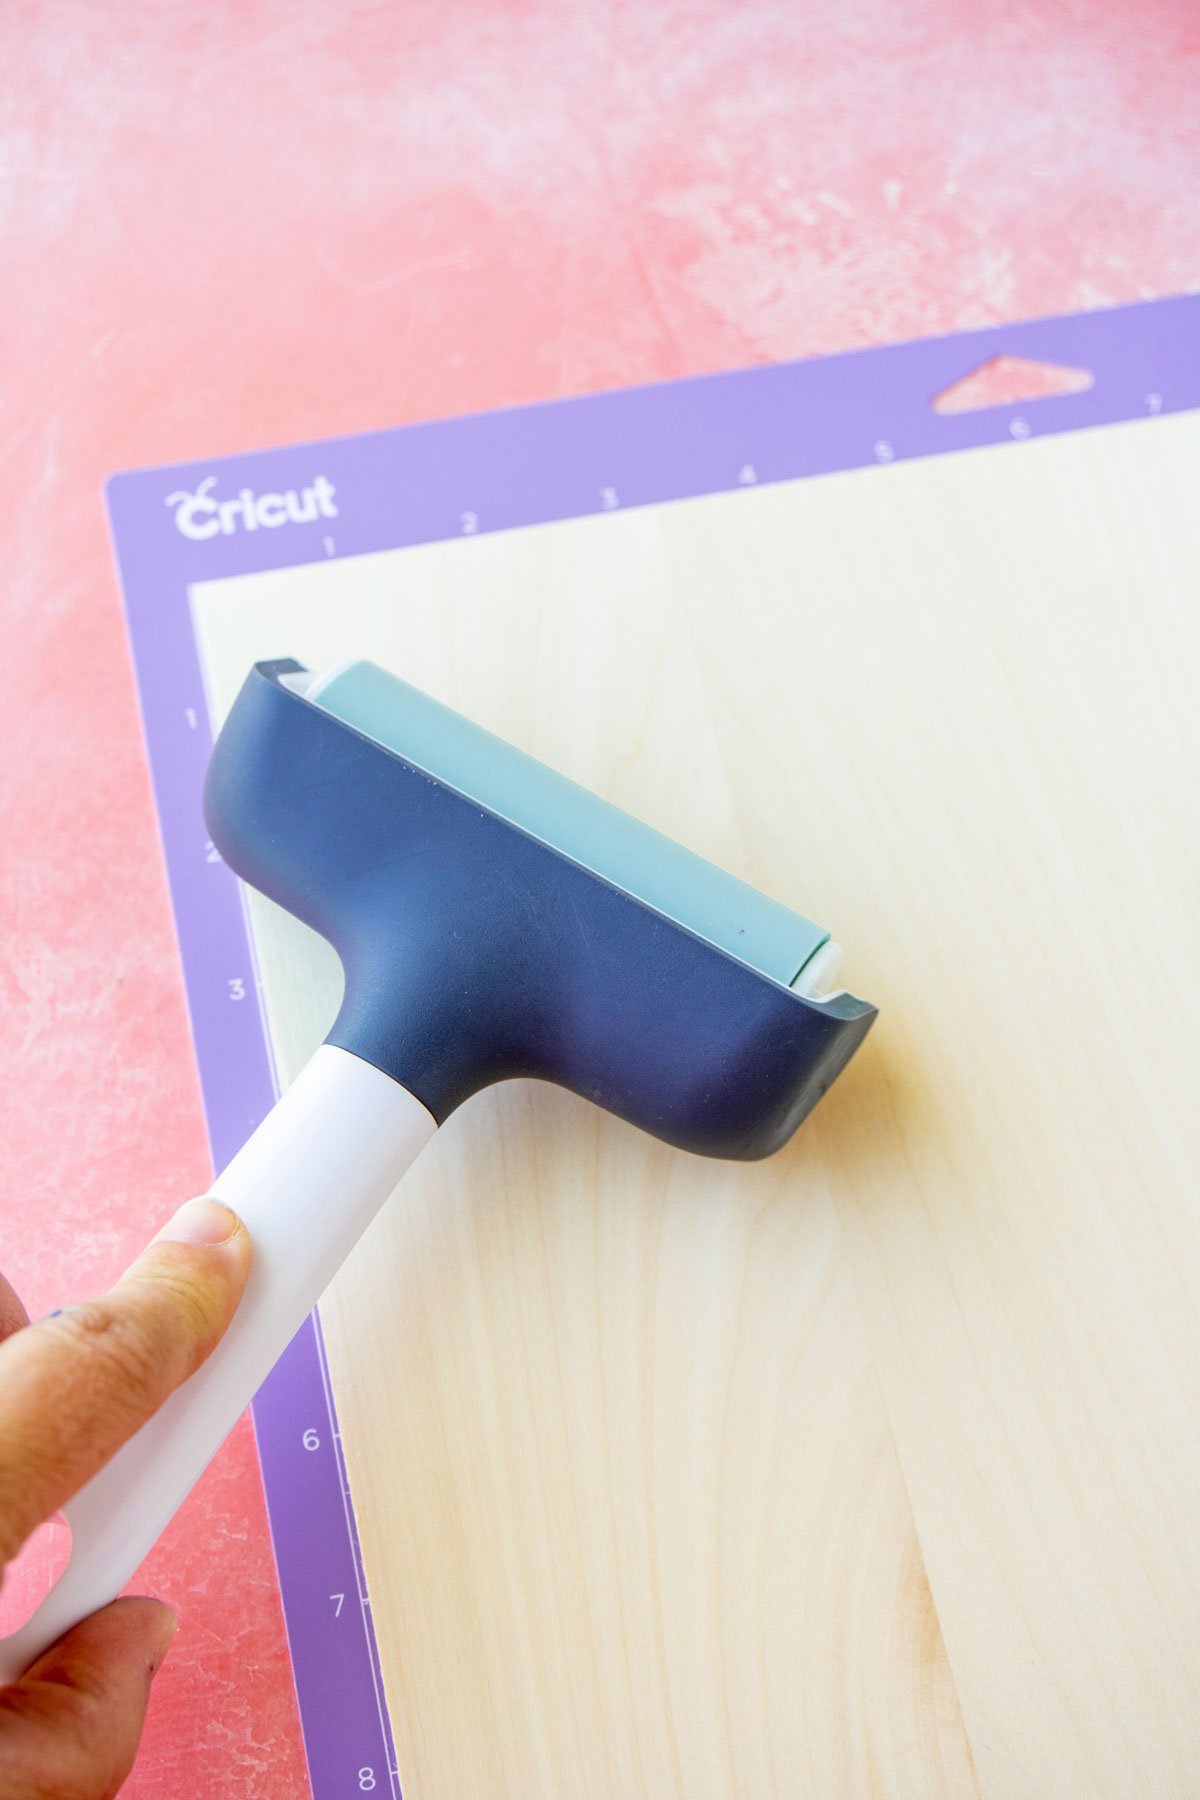
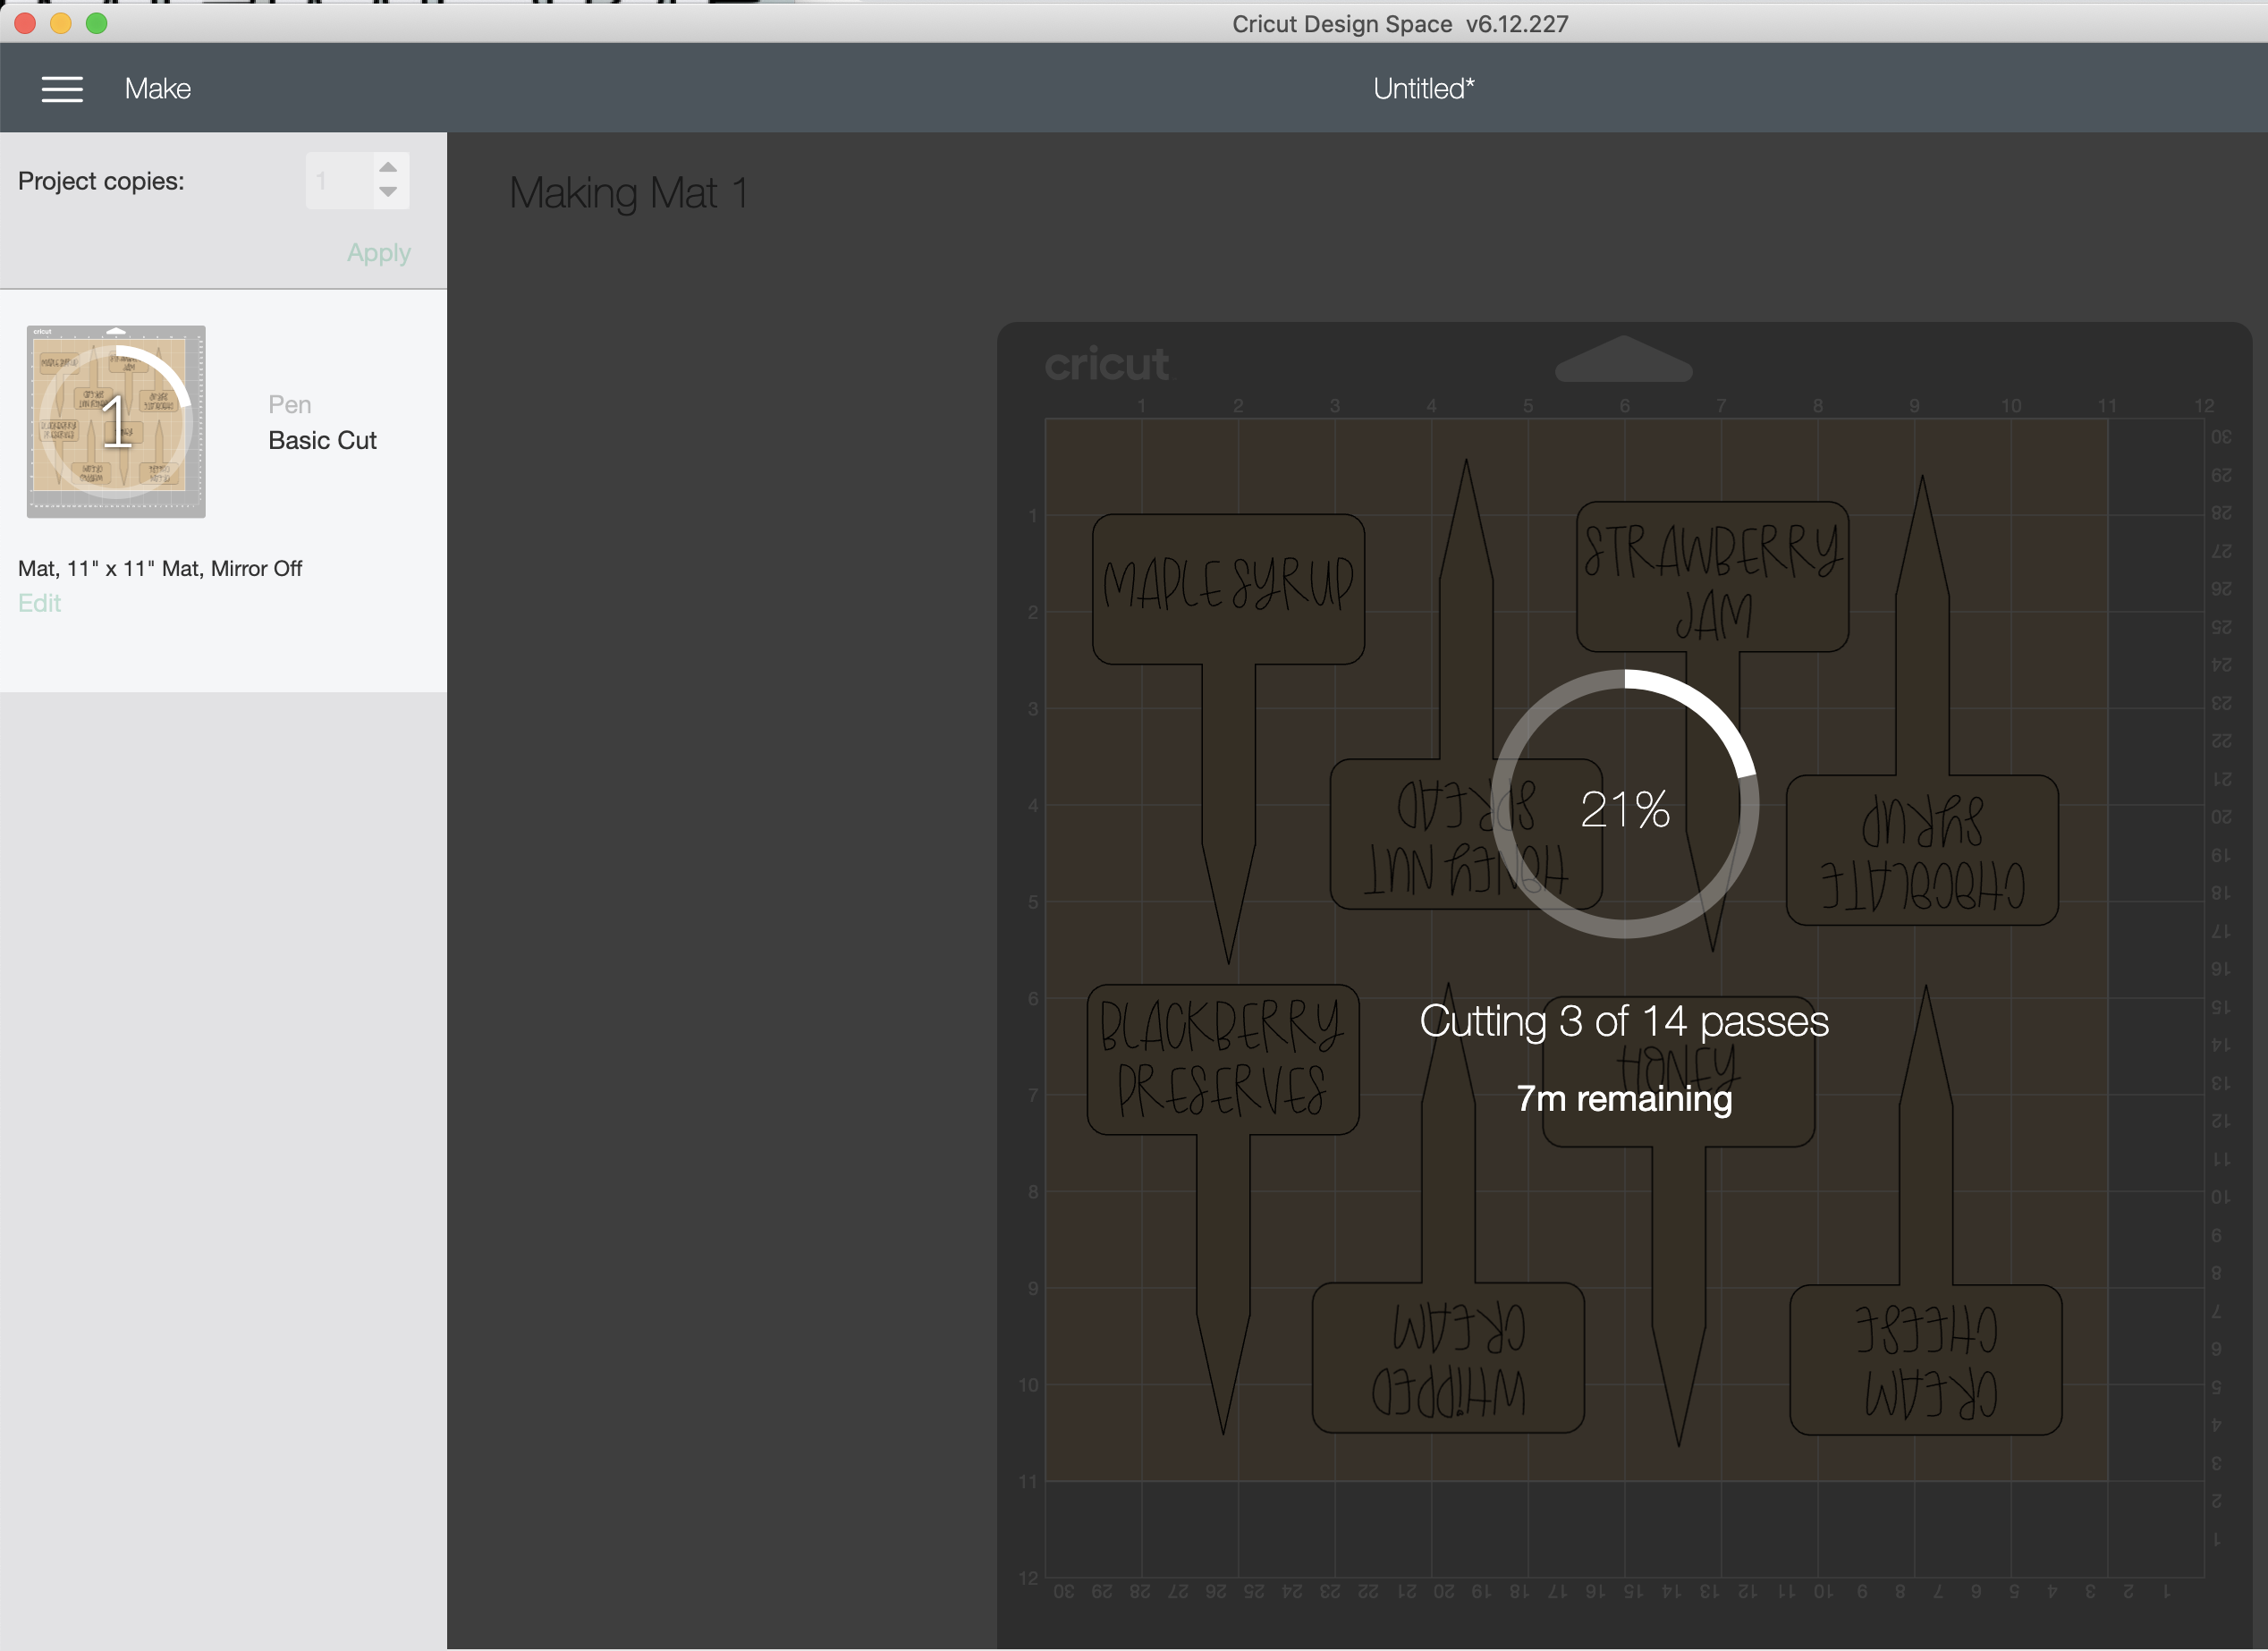
Once you’ve finalized the labels you want, choose the option to Make It in the left corner. On the Make It Screen make sure to change your material to 11×11 inch (the size of the Cricut Basswood) and make sure mirror is off. Once you’ve changed the size, you can play around with the layout of the labels on the wood. For instance, I wanted to cut eight different labels. When I clicked Make It, Cricut split them across two pieces of wood. For the sake of saving wood, I moved all eight labels to one sheet and just rotated them and moved them around so they all fit well. I recommend keeping a bit of space (rotating the labels does wonders!) but you should be able to cut them pretty close together without any issues! Here’s where I ended up with my eight labels! Once you’ve finalized your layout, continue to the next step where you’ll choose your machine (Cricut Maker) and your material (1/16 basswood). Design Space will prompt you to insert the Knife Blade and a pen into the Cricut Maker. Make sure they’re both in securely. It’ll also prompt you to move the star grip things all the way out (typically only going to be in if you’re working on smaller projects – mine are almost always out). This allows enough space for the basswood to fit through the machine during loading. Place your basswood on the StrongGrip mat. Use the brayer to gently press it down and then add a thin layer of masking tape around the outside of the wood, again to help keep it in place.
3 – Draw and Cut Your Design
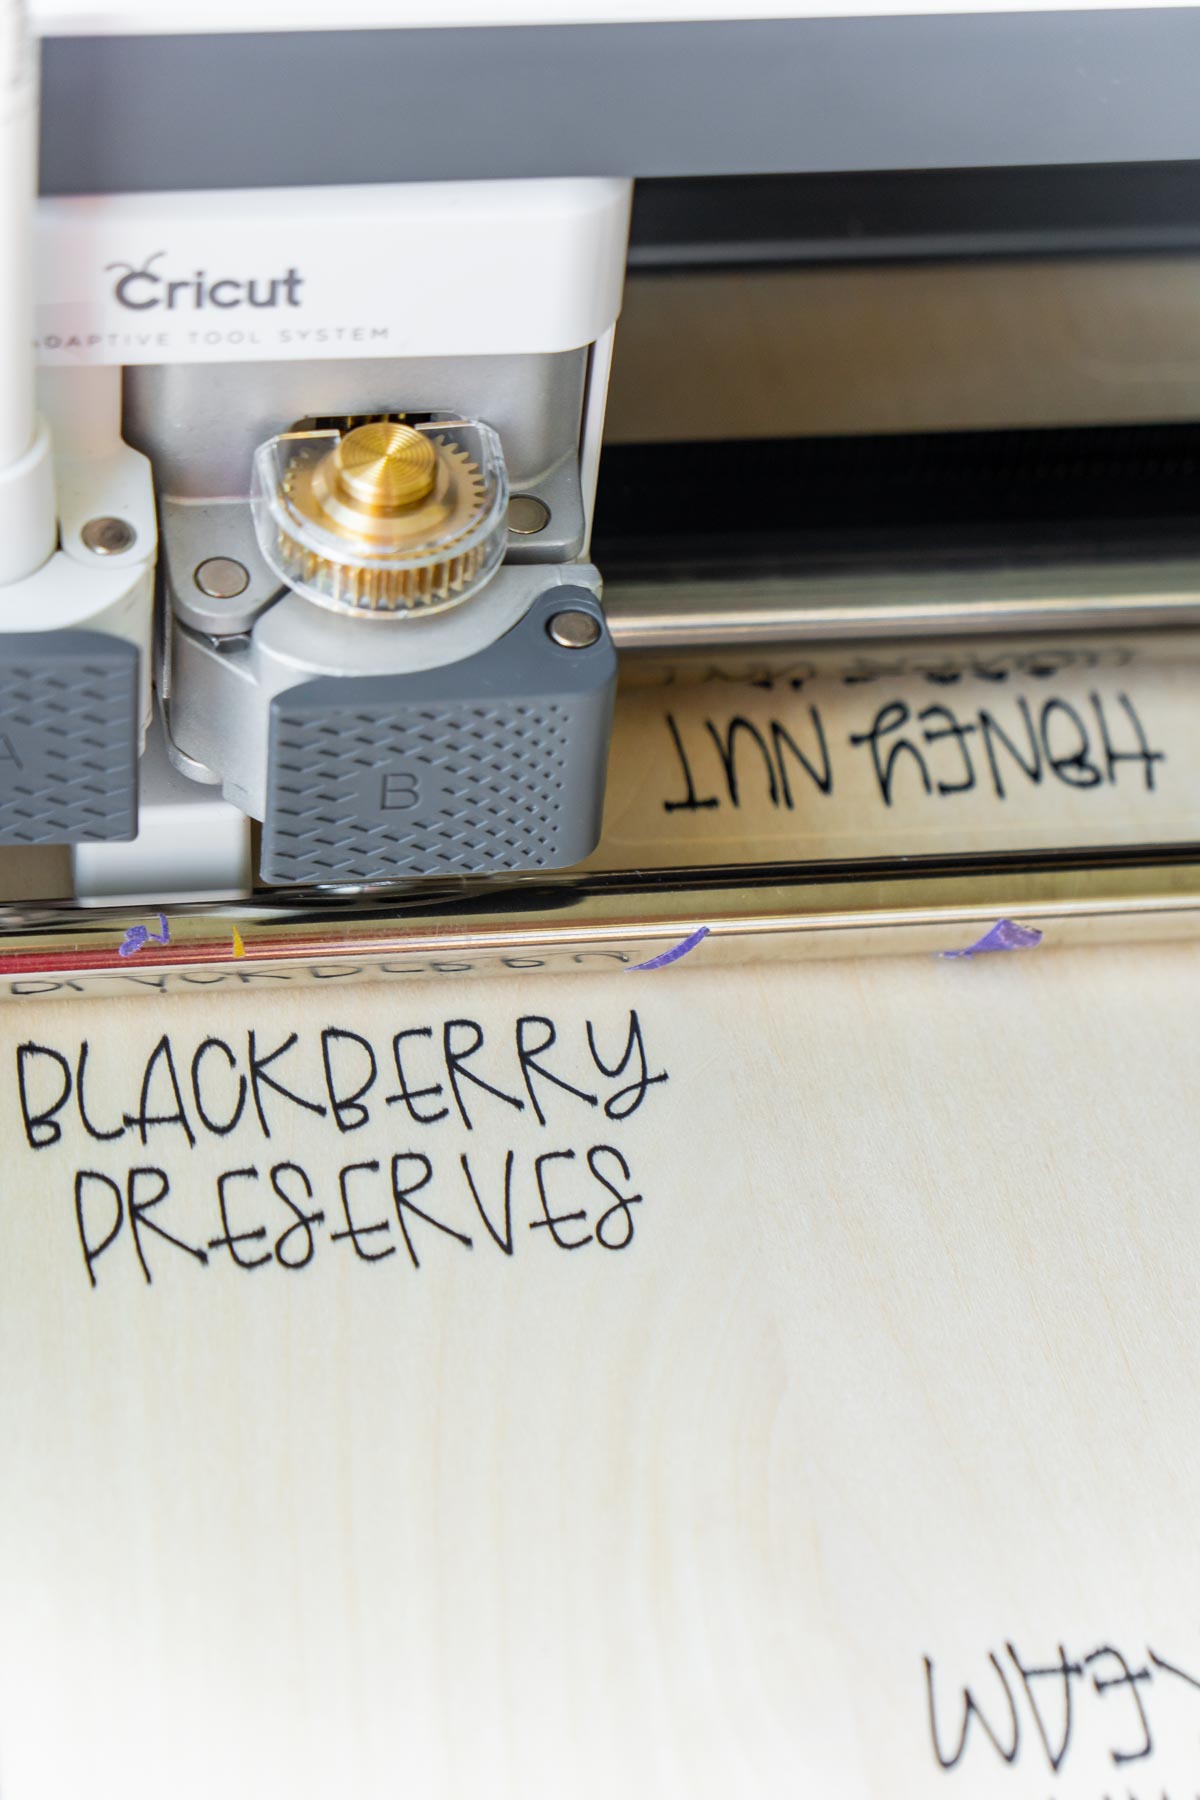
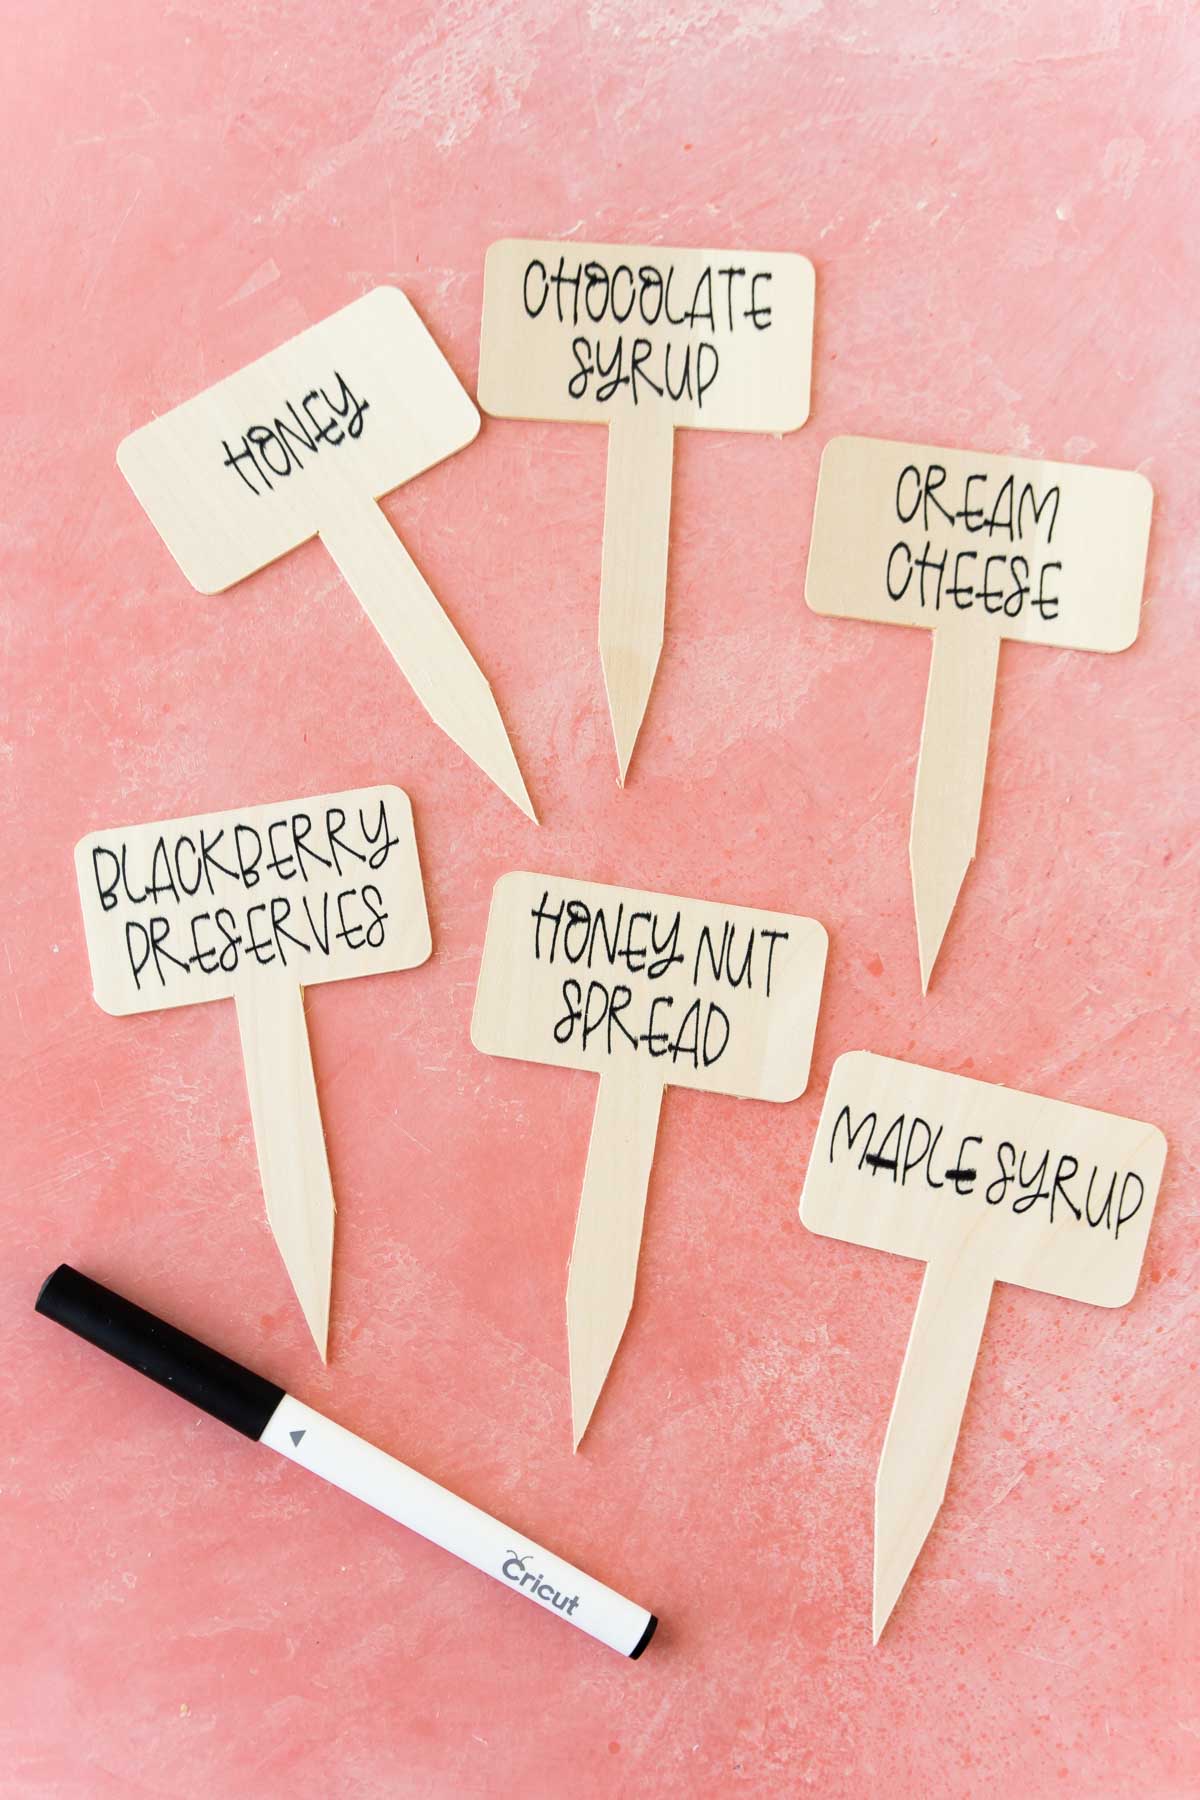
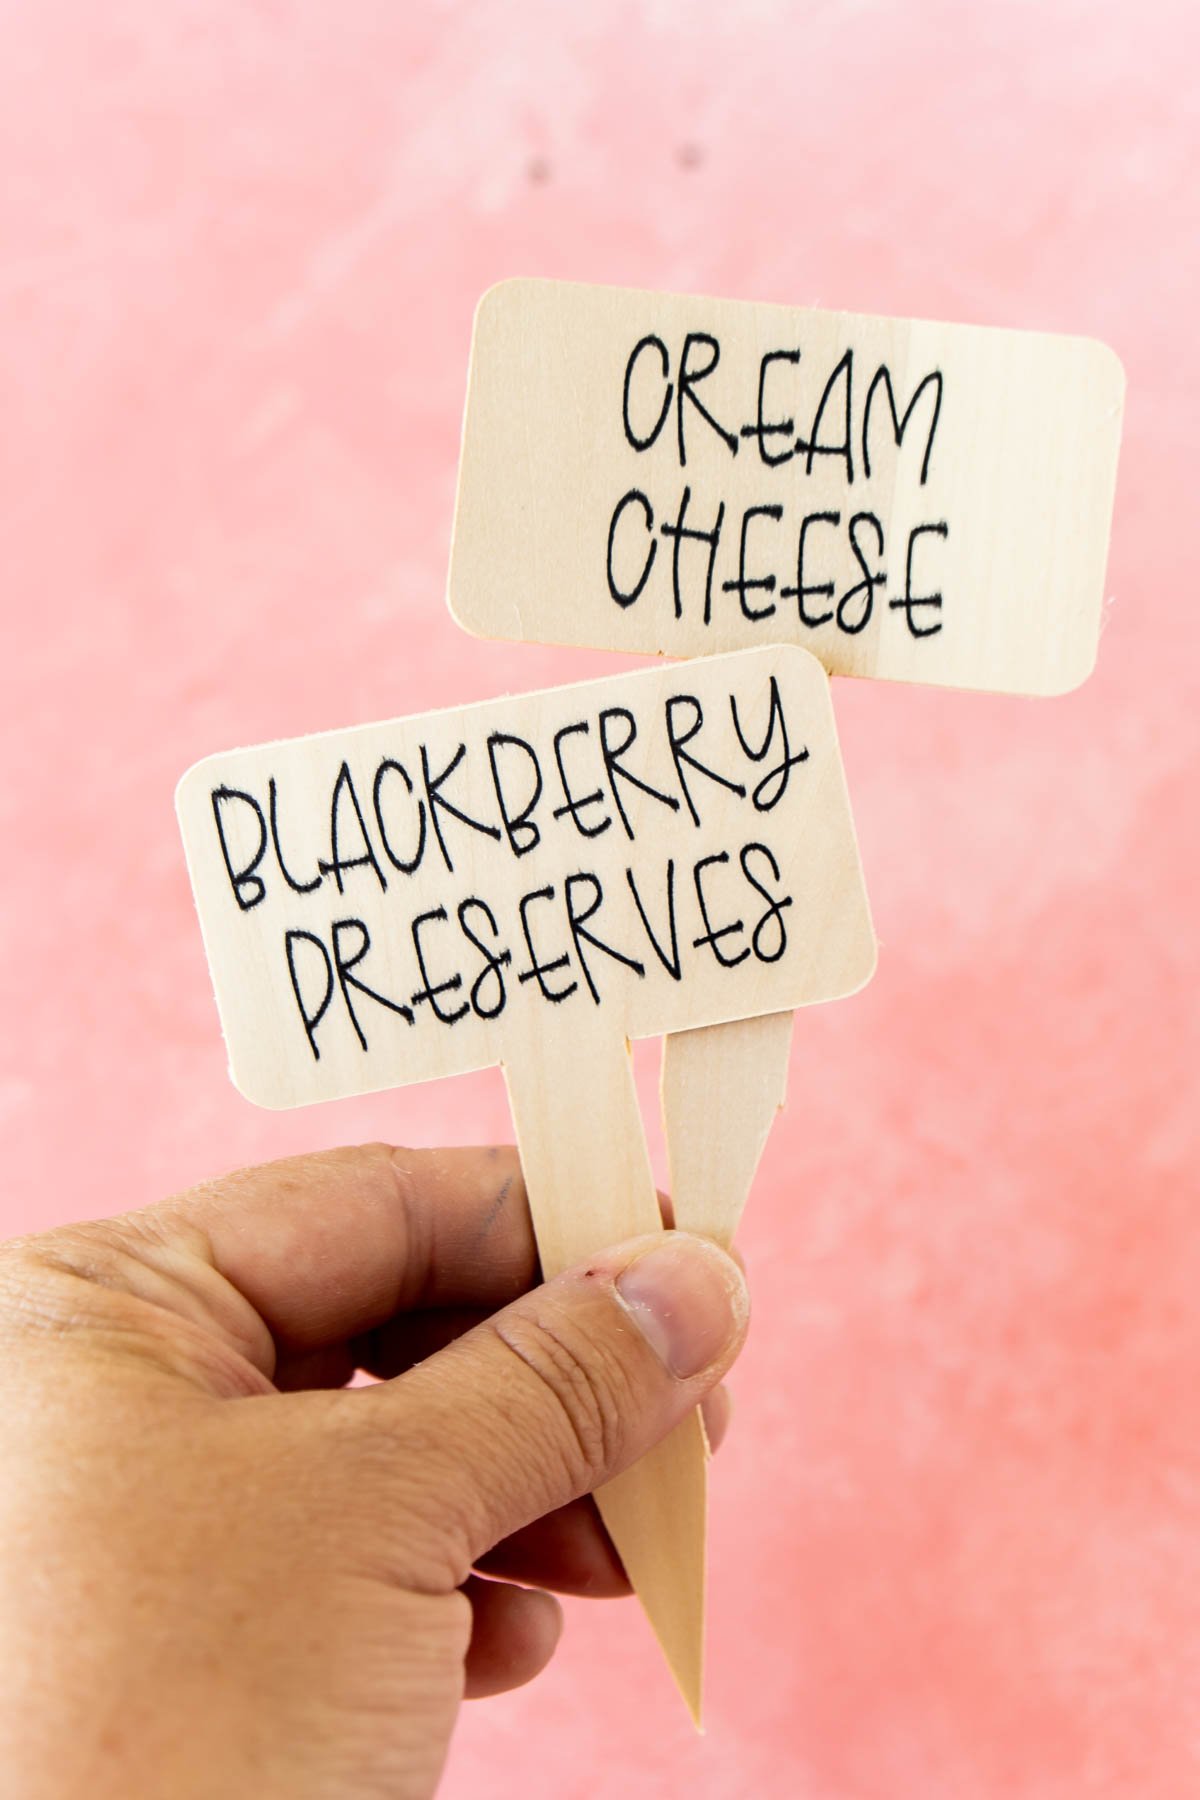
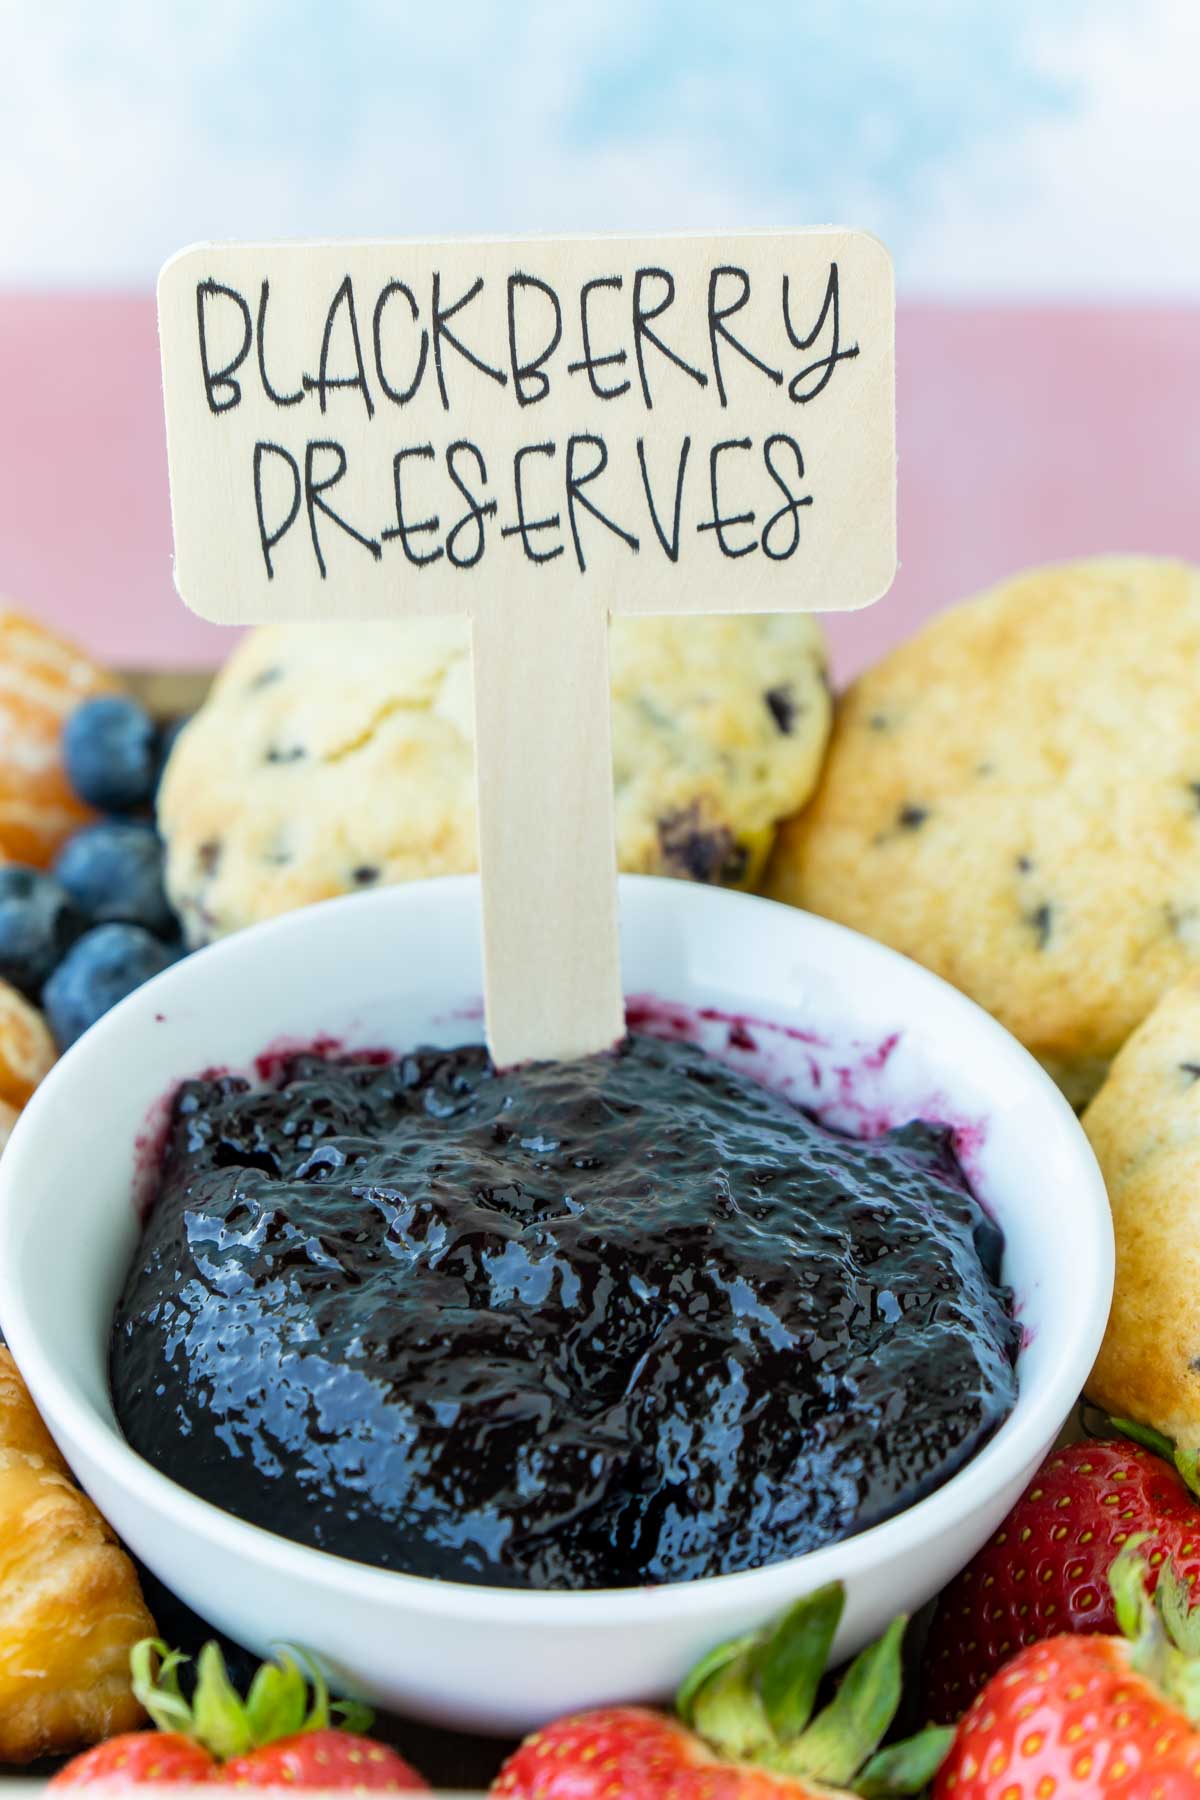
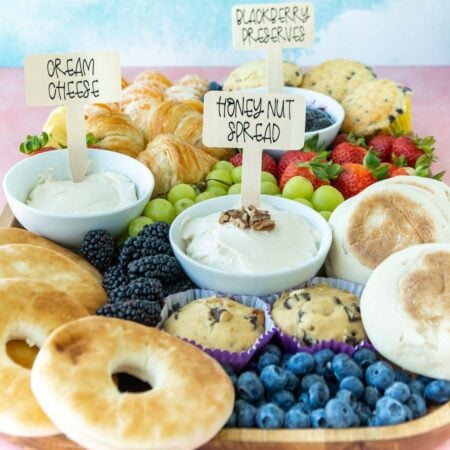
Load it into your machine then press the little Cricut button to start your cut. The first thing that’ll happen is the drawing of the letters. It’s pretty fascinating to watch, and I love how pretty the lettering turns out – much better than my handwriting! Once the lettering is done, it’ll start cutting immediately – no need to change tools, add anything, or do anything else. It’s smart enough to just start cutting around the letters. Just as a forewarning, cutting basswood isn’t like cutting vinyl for matching Disney shirts. There is no speed cutting option, and it’ll likely need to cut through a lot of times. I think mine did 14 cuts, so be aware that it’s going to take a while. I typically start the cut then work on some other things, checking in to make sure it’s going okay every once in a while (but as long as the wood is secured on the mat, I’ve never really fun into issues). Once the design is completely cut, unload the mat and VERY CAREFULLY remove the cut pieces from the mat and from the extra basswood around the cuts. I say very carefully because basswood, especially small thin pieces that are typically leftover after cuts, can break very easily. You don’t want to go too fast on this part and accidentally break your beautiful labels! I mentioned it before but if you look at the image above, the thick part in the maple syrup label is with a thicker pen. It felt too thick for me, so I went with the thinner pen. It’s your choice, just wanted to show you an example! Now all you need to do is add those darling labels to your breakfast board and you’re golden! Or maybe I should say no you are honey! They’re great for labeling things that might not be obvious – jams, flavored cream cheeses, other random spreads! Like these blackberry preserves for example, you’d never know if this was blackberry, blueberry, or even black raspberry! Or you could also put them in other food items to signify different types of muffins, pancakes, etc. So many ways to use them!
Breakfast Charcuterie Board Ideas
Speaking of all sorts of ways to use the labels – that brings me to sharing some of my favorite breakfast board ideas I’ve put together! There are so many different ways you can make a breakfast board, I just wanted to share my three personal favorites. One of these three should work for pretty much any occasion!
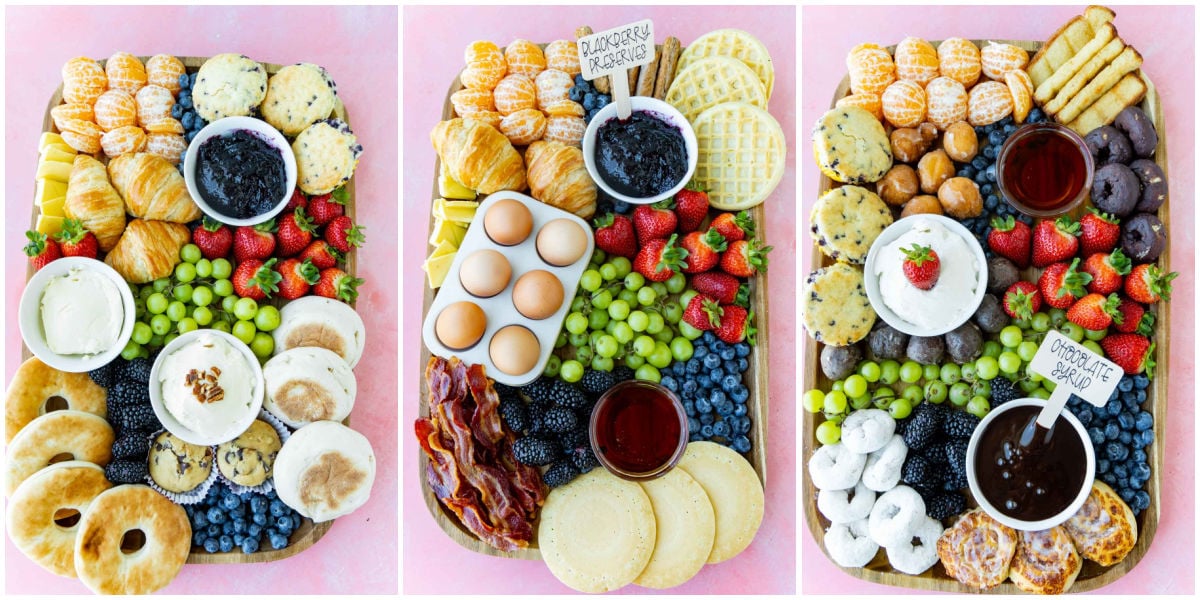
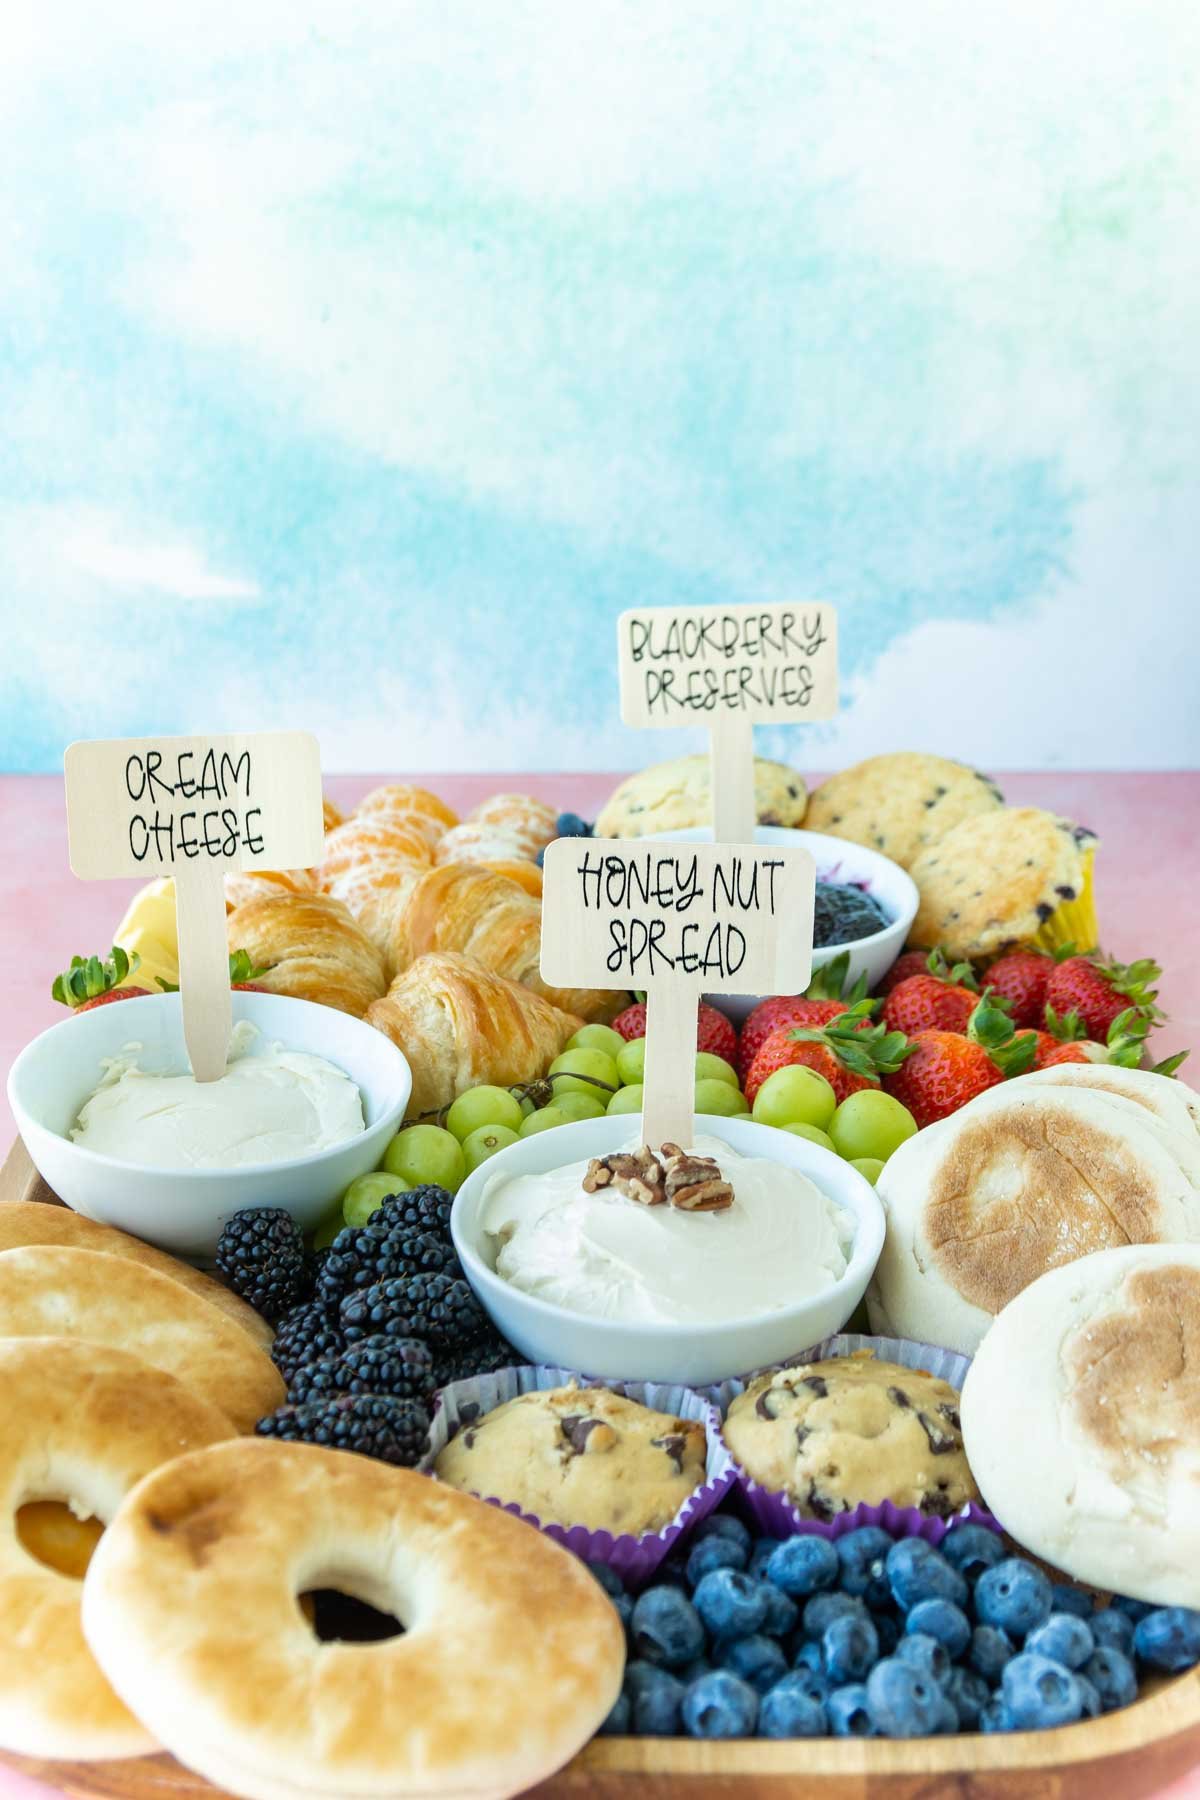
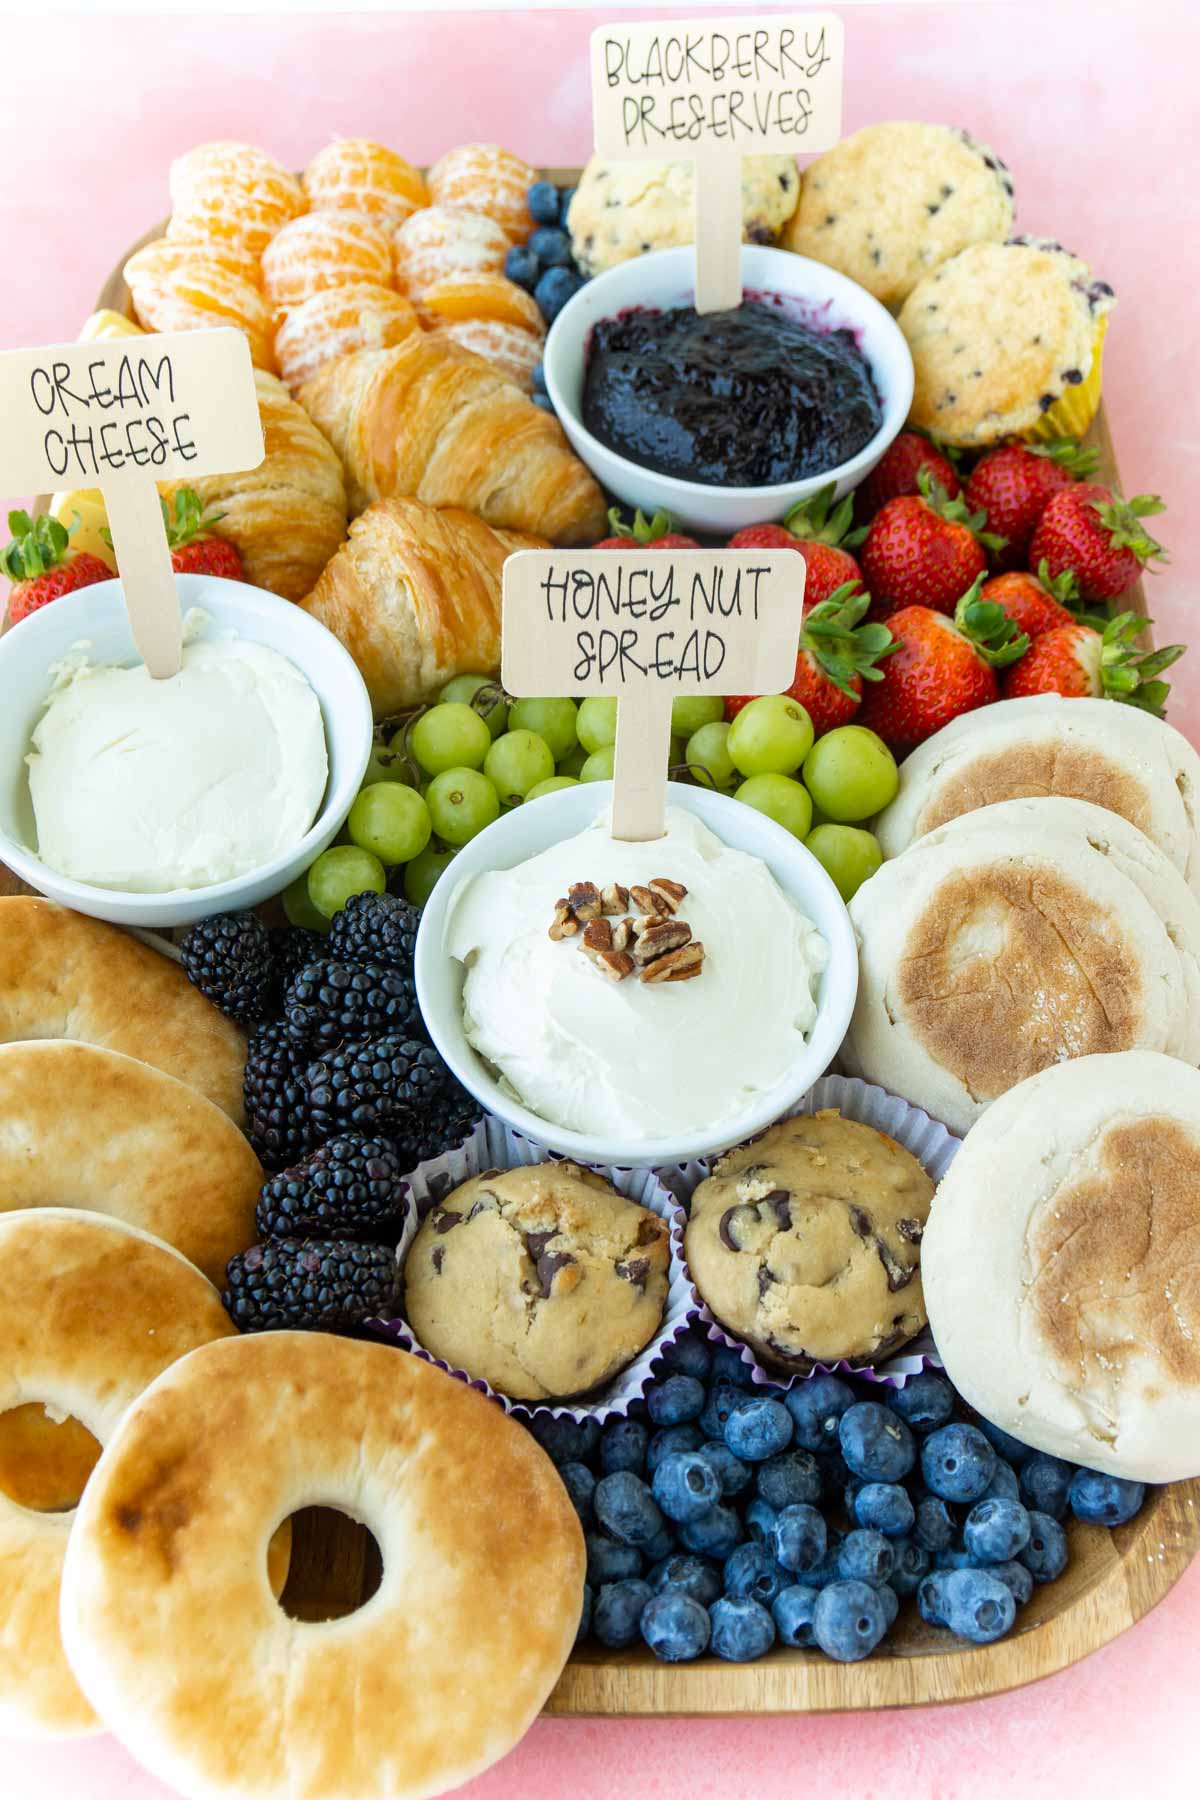
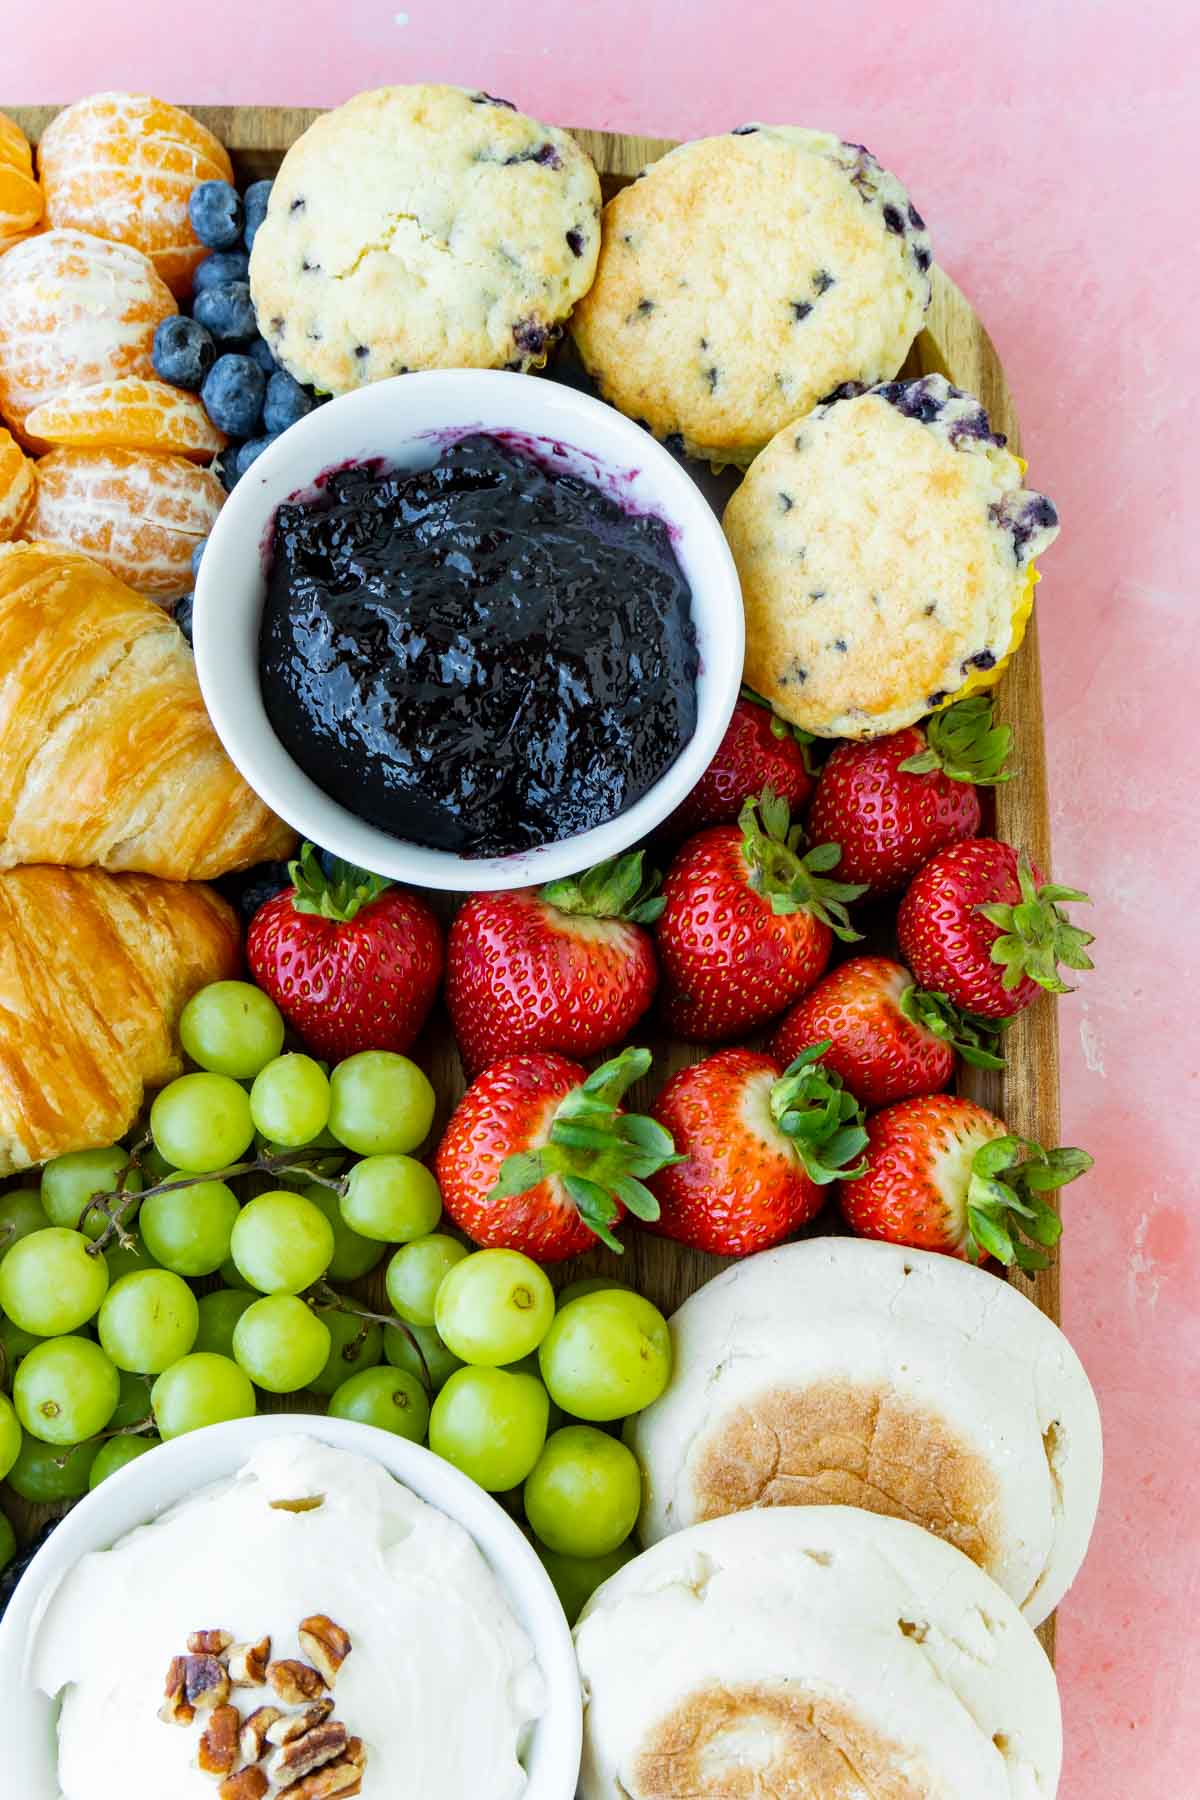
1 – Breads and Spreads Board
This first breakfast charcuterie board is perfect if you want to be able to have something that sits out for a while and you want people to have good grab and go options that are still good whether they’re warm or at room temperature. It’s all about baked goods and spreads to enjoy with the baked goods. Oh and fruit. I always add fruit to all of my breakfast boards because well fruit is just great for breakfast, and it adds a lot of color and texture to boards! Things that would be good on this board:
Muffins – I recommend these lemon blueberry muffins or these banana chocolate chip muffinsBagelsEnglish MuffinsCroissants – or these homemade crescent rolls would work too! Regular breadsSweet breads – I love this cranberry orange bread or this pineapple bread.Jams and PreservesCompotes and fruit toppings – this blueberry compote would be a huge hit! Butters of any kindCream cheeses and cheese spreadsChocolate spreadPeanut butter or any other nut butters (make sure no nut allergies!)
I’m a huge baked goods person so this may be my favorite of the three breakfast boards, but I digress – let’s talk about the second board!
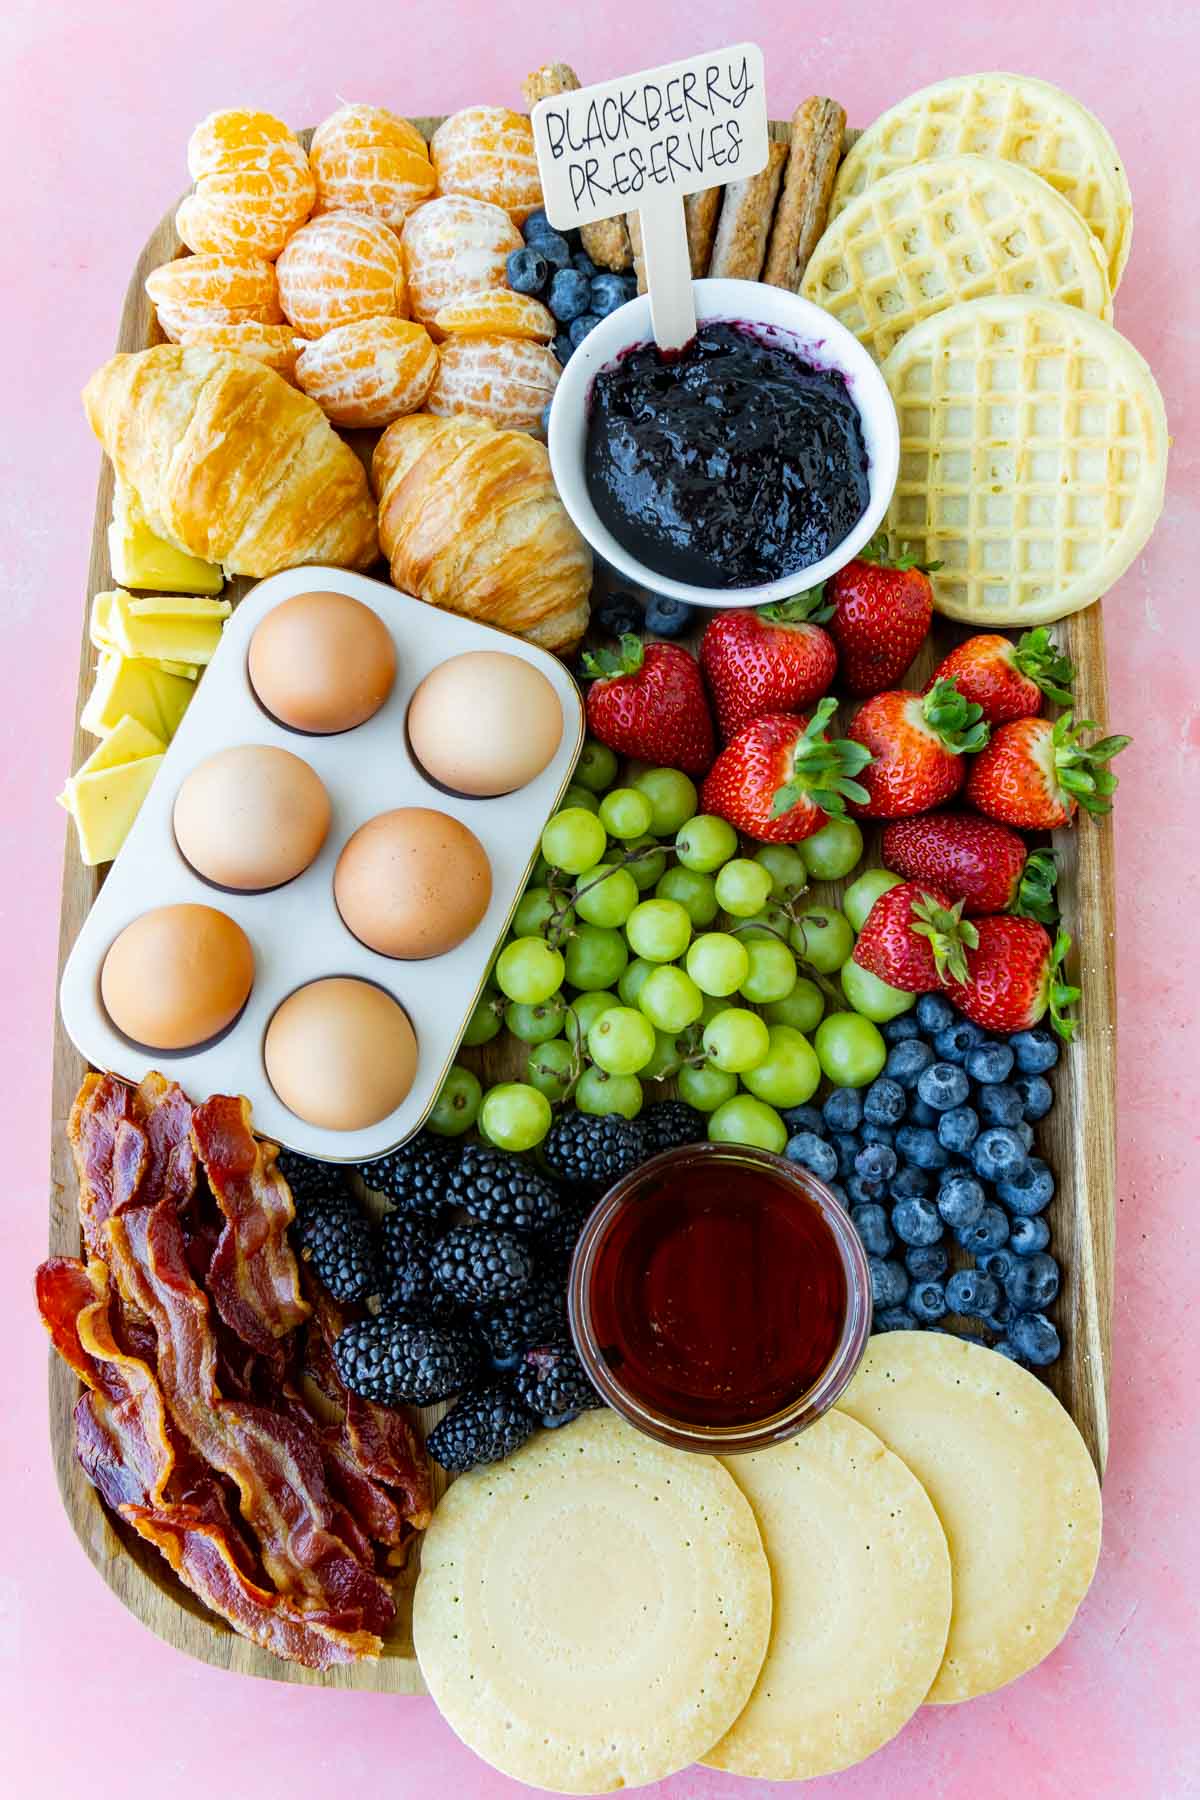
2 – Traditional Breakfast Board
This second board is designed to include all sorts of traditional breakfast offerings. If it’s something you’d think of as being popular for breakfast, throw it on this board! Since this board will typically include meats and items that are better warm, I recommend this one when you’re actually serving breakfast or brunch and people will be eating at one time, not necessarily throughout an event. This would be a great addition to something like a Christmas morning party! Some items that would be good:
Eggs – I recommend hard boiled, but you could also do something like these egg breakfast muffins.Breakfast meats – bacon, sausage, ham, Canadian bacon, prosciutto, smoked salmon all come to mind! Or do something with a breakfast meat in it like these bacon cinnamon rolls or sausage egg muffins. Traditional breakfast foods – you could totally do something like a bowl with homemade sausage gravy and biscuits or already rolled breakfast burritos, hash brown patties, etc. Basic breakfast – think simple breakfast items like pancakes, waffles, croissants, toast, etc. Toppings – jams, butters, syrups, spreads that you would typically put on your pancakes or waffles would all be a good option!
Just think if it’s a popular breakfast choice, it’s a good choice for this board!
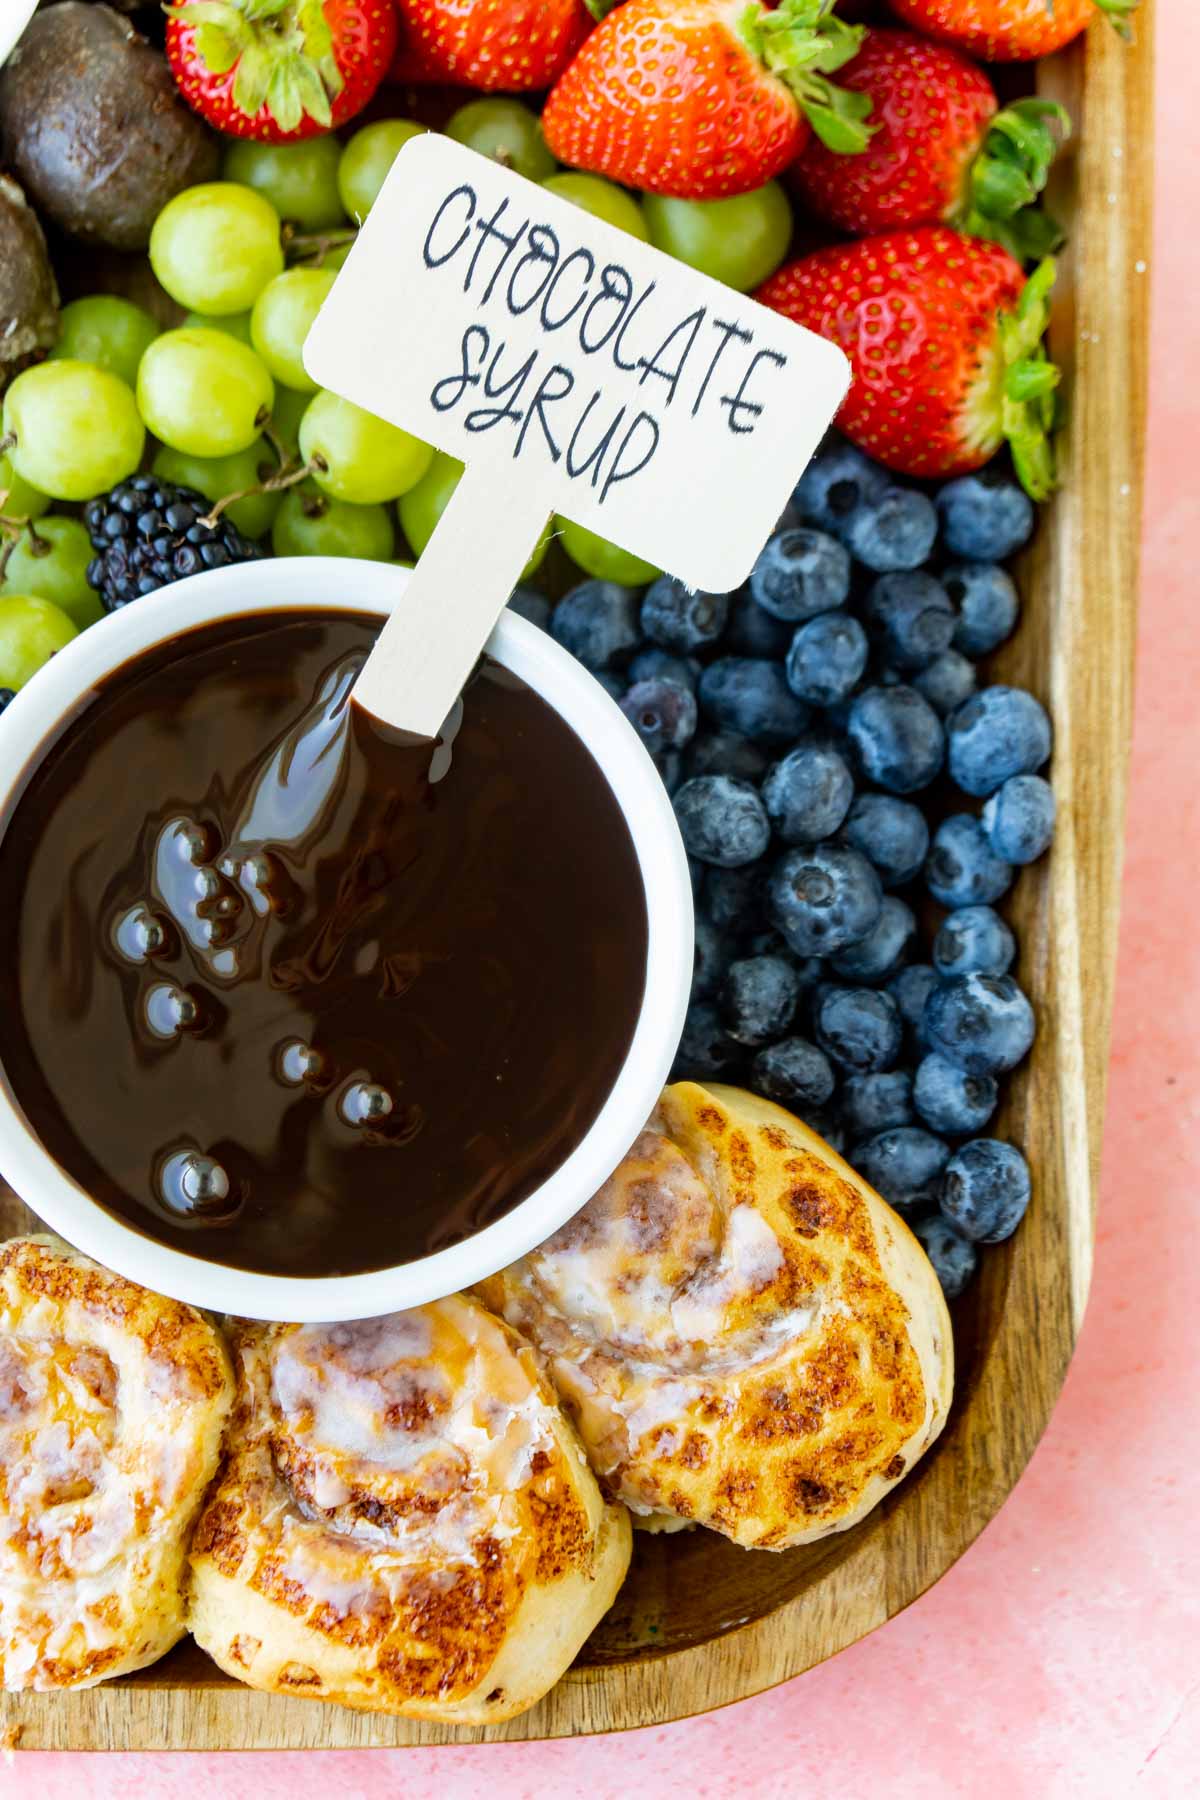
3 – Sweet Start Breakfast Charcuterie Board
And finally, my third board idea – the sweet start board. I know I said the breads and spreads was my favorite but I changed my mind. This sweet start breakfast charcuterie board is my favorite because well it’s all about sweet things for breakfast! This board is a good option again, just like the breads and spreads option, if you want something that can hang out for a couple of hours without any issues with things getting cold, not being good after sitting for a while, etc. Anything breakfasty that is sweet can work for this board but if you need some ideas:
Donuts – I like to do regular donuts and donut holes and if you need a recipe, these rainbow donuts are fun! Muffins – things like cranberry orange muffins with a sweet glaze or pumpkin cream cheese muffins (with a cheesecake filling). Danishes and pastries – I recommend these strawberry danishes and strawberry scones, but choose your favorites! Sweet breads – this funfetti ice cream bread would be perfect as would this chocolate chip zucchini bread! You could even serve up a yummy dessert dip like this funfetti dip to go with it!French toast sticks Cinnamon rolls – you could do regular size or I recommend doing something smaller like these mini chocolate rolls or these mini pumpkin cinnamon rolls! Breakfast cookiesBreakfast sundae toppings – chocolate syrup, whipped cream, caramel topping, etc. Jams and sweet spreads – Nutella would be a great choice!
Expert Tips for Creating Breakfast Boards
Add charcuterie board labels to anything that isn’t completely obvious what it is. Syrups, flavored cream cheeses, flavored butters, and jams all can be helped with labels! Start with larger items like pancakes, donuts, waffles, etc. and fill in the gaps with smaller items like fruit, sausages, and spreads. Add a variety of items to the board so there is something for everyone! If something runs out because it’s popular, you can always fill it in with more! Wash and peel any fruit before you put it on the board. Grapes can stay in small bunches but make sure they’re small – no one really wants an entire vine of grapes and breaking them is annoying! Place small spoons, tongs, and other serving utensils near the board so that people can use them to grab small items if they’d rather not use their hands! Use large dishes filled with spreads and toppings to anchor the board like I did with the bowls and egg holder in my boards above!
More Easy Breakfast Ideas
While these things may not be a great fit for a breakfast board, they’re still delicious and perfect for serving breakfast to a group!
Lemon poppyseed bread with glaze – this refreshing bread has a bright citrus flavor and a sweet glaze topping! Hash brown cups – the easiest breakfast ever, just make these hash brown cups and top with scrambled egg sand cut up bacon pieces! Cinnamon streusel coffee cake – a super simple coffee cake with a yummy streusel topping! French toast casserole with cream cheese – this yummy dish is kind a sweet casserole combined with your favorite French toast! Great for serving to a crowd! Sausage egg breakfast casserole – a delicious dish that combines eggs, sausage, bread, and cheese all together in every piece!